Windows 10 är en av de mest efterlängtade versionerna av Windows av Microsoft. Även om Windows 8 skapade en ny trend i Desktop OS-världen hade det några problem med design och prestanda som var huvudfokus för Microsoft i Windows 10. Windows 10 Final Build avslöjades den 29 juli 2015 för Desktop som samt smartphones.
Det innehöll en hel del modifieringar genom att ta hänsyn till bristerna i Windows 8. I själva verket är det en avancerad version av Windows men det finns fortfarande ett antal konsekvenser som uppstår varje dag med olika användare.
En stor del av dessa konsekvenser är felen som uppstår när man försöker göra en viss uppgift. Ett antal personer har kommit igenom ett felmeddelande när de försöker öppna olika programvaror och webbläsare i sina Windows 10. Detta fel kommer med ett felmeddelande som säger att applikationen inte kunde starta korrekt (0xc0000005). Klicka på OK för att stänga programmet . Detta fel uppstår vanligtvis med webbläsare men det är inte begränsat till dessa. Alla applikationer i Windows kan sluta svara på grund av detta fel. Så det måste fixas för att återställa den viktiga programvaran till att fungera.

11/12/2016: Användare rapporterade att metoderna nedan kommer också att fungera på Windows 7.
Orsak bakom Windows 10-fel 0xc0000005:
Det finns ett antal kända orsaker som orsakar att detta fel stör olika programvaror i Windows 10. En av de anledningar som anses vara en viktig orsak är ett antivirusprogram från tredje part som orsakar konflikter med körbara filer och påverkar deras verksamhet. Å andra sidan kan register bli skadade på grund av skadlig kod och virus som gör att programmen beter sig onormalt. Ibland kan dåliga hårdvarudrivrutiner också vara den skyldige som orsakar detta fel.
Lösningar för att fixa Windows 10-fel 0xc0000005:
Baserat på ovanstående skäl är lösningarna enkla. Så gå igenom följande metoder för att bli av med detta frustrerande felmeddelande.
Reparera korrupta systemfiler
Ladda ner och kör Restoro för att skanna och återställa korrupta och saknade filer härifrån , fortsätt med lösningarna nedan när du är klar. Det är viktigt att se till att alla systemfiler är intakta och inte skadade innan du fortsätter med lösningarna nedan.
Metod 1: Fixa antivirusprogrammet
Antivirusprogram kan påverka de körbara filerna i ett antal program. Så, för att lösa detta problem måste du inaktivera antivirusprogrammet från tredje part för att kontrollera om det var den skyldige eller inte. Observera att inaktivera antivirusprogram kan leda till allvarliga hot mot din dator när du är ansluten till internet.
Du kan också lita på Windows egen säkerhetsprogramvara, dvs. Windows Defender . Den har samma funktionalitet som alla andra antivirusprogram. Du kan inaktivera antivirusprogrammet genom att navigera till dess inställningar och stänga av skärmen.

Kontrollera efter felet igen när det är inaktiverat. Om det fortfarande kvarstår, gå till nästa metod.
Metod 2: Fastställande av register
Det registret är den centrala databasen i Windows som ständigt används av datorn för att hjälpa den att läsa många olika filer och inställningar som behövs för att köra. Register kan bli skadade på grund av skada på vissa filer som krävs för att stapla allt på plats. Därför rekommenderar de flesta experter att du säkerhetskopierar ditt register och förvarar den här säkerhetskopian på ett konventionellt USB-minne så att du kanske kan återuppliva ditt register i det tidigare tillståndet vid korruption. Men om du inte säkerhetskopierade ditt register, följ dessa steg för att fixa register för att lösa felet 0xc0000005 .
1. Ladda ner registerrensare från den här länken .
2. När den har laddats ner installerar du den med de rekommenderade inställningarna. Öppna programvaran när installationsprocessen är klar.
3. I gränssnittet klickar du på registerfliken i den vänstra rutan och klickar på knappen märkt som Skanna efter problem . Det börjar söka efter fel i registret och när sökningen är klar aktiveras en knapp Fix Selected Issue . Klicka på den knappen så fixas allt.

Metod # 3: Åtgärda felaktiga drivrutiner
Drivrutiner är de program som hjälper datorn att kommunicera med hårdvara som är ansluten till den. Så när de skadas tenderar hårdvaran att orsaka problem . Att fixa dessa felaktiga dykare kan hjälpa dig på ett antal sätt. Följ stegen nedan.
1. Öppna Enhetshanteraren genom att trycka på Win + X och välja den i listan.
2. Bläddra nedåt i Enhetshanteraren för att se om det finns någon hårdvara med gult märke. Om det finns, högerklicka där borta och välj Uppdatera drivrutinsprogramvara . Om du nyligen har installerat drivrutiner, installerar du om dessa drivrutiner också.

3. I fönstret som visas efter klickar du på Sök automatiskt efter uppdaterad drivrutinsprogramvara så att den kan söka och installera drivrutiner automatiskt. Om du har laddat ner drivrutinerna manuellt, klicka på alternativet nedan för att bläddra och installera dem. Kontrollera efter felet efter att processen är klar.

Metod 4: Fix BCD
Denna metod ska utföras av användarna på egen risk. Detta fungerade för vissa och inte för vissa. Du måste också aktivera Windows igen efter att ha utfört stegen i den här guiden.
- Håll Windows-tangenten och trycka på X . Välj kommandotolken (Admin)
- Skriv “ bcdedit” och tryck på ENTER. Om din Windows Boot Loader Path är xOsload.exe måste du ta bort några filer och reparera din BCD. Du kan se detta i PATH-fältet efter att du har utfört kommandot “ bcdedit”.
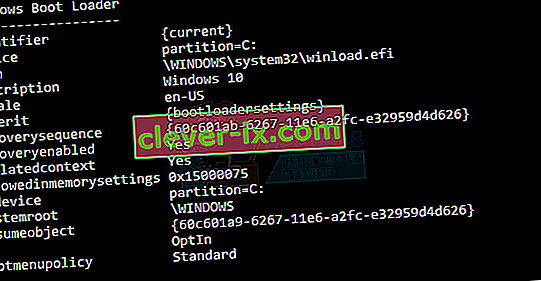
- När du är klar utför du följande kommandon nedan, vissa kanske inte hittas men ignorerar felen och fortsätter till det sista. Se till att du trycker på ENTER-tangenten efter varje kommando.

Del D: \ Windows \ System32 \ xOsload.exe Del D: \ Windows \ System32 \ xNtKrnl.exe Del D: \ Windows \ System32 \ Drivrutiner \ oem-drv64.sys attribba c: \ boot \ bcd -h -r -s ren c: \ boot \ bcd bcd.old bootrec / rebuildbcd
Metod 5: Sök efter Windows-uppdateringar
Windows-uppdateringar innehåller ofta korrigeringar för vissa buggar och fel men de är också ökända för att ge plats för nya problem på människors datorer. I det här steget kommer vi dock att leta efter uppdateringar för ditt operativsystem eftersom Microsoft ofta korrigerar eventuella problem som kommer från deras uppdateringar. För att göra det, följ guiden nedan.
- Tryck på "Windows" + "I" för att öppna Windows-inställningar.
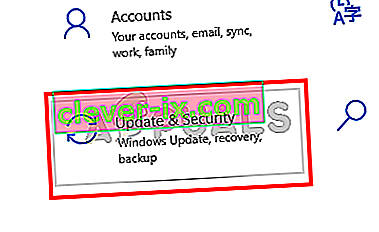
- Klicka på alternativet "Uppdateringar och säkerhet" i inställningarna och välj alternativet "Windows Update" från vänster sida .
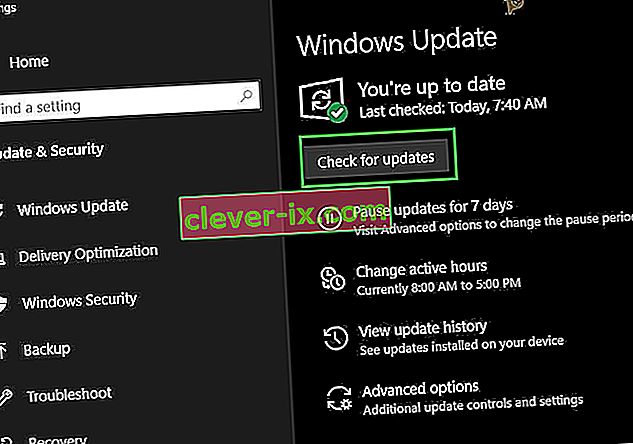
- På nästa skärm klickar du på alternativet "Sök efter uppdateringar" och det uppmanar Windows automatiskt att söka efter tillgängliga uppdateringar.
- När uppdateringskontrollen är klar klickar du på knappen "Hämta" för att utlösa nedladdning och installation av nya uppdateringar på din dator.
- Efter att dessa uppdateringar har installerats, kontrollera om problemet har lösts på din dator.


Metod 6: Återställa datorn
Om du just har börjat få det här problemet, kan det utlösas på grund av en felaktig drivrutinsinstallation eller till och med på grund av ett oseriöst program som du kanske har installerat på din dator nyligen. Därför kommer vi i det här steget att återställa datorns tillstånd till ett tidigare datum och förhoppningsvis bör detta få vårt problem rättat om det berodde på ovan angivna skäl. För att göra detta:
- Tryck på “Windows” + “R” för att öppna körprompten.
- Skriv “rstrui” och tryck “Enter” för att öppna återställningshanteringsfönstret.
- Klicka på "Nästa" och markera alternativet "Visa fler återställningspunkter" .
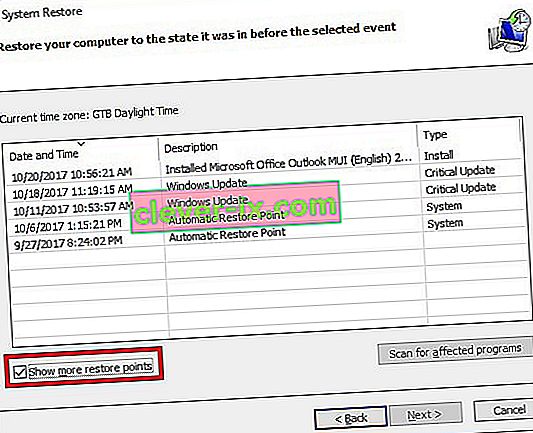
- Välj en återställningspunkt från listan som ligger före det datum då problemet uppstod.
- Klicka på “Nästa” igen och följ instruktionerna på skärmen för att återställa allt till det valda datumet.
- Efter att återställningen är klar, kontrollera om problemet fortfarande kvarstår.


Metod 7: Aktivera brandvägg
Det är i vissa fall möjligt att felet utlöses eftersom programmet är misstänkt eller åtminstone om det har markerats misstänkt och Windows-brandväggen inte körs på din dator för att validera detta misstänkt. I detta steg kommer vi därför att se till att Windows-brandväggen är aktiverad för att bli av med detta fel. För det:
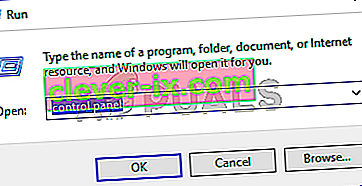
- Tryck på “Windows” + “R” för att öppna körprompten.
- Skriv in "Kontrollpanelen" och tryck på "Enter" för att starta det klassiska kontrollpanelgränssnittet.
- In the Control Panel, click on the “ViewBy:” option and select the “Large Icons” button.
- After making this selection, click on the “Windows Defender Firewall” option to launch the Firewall and then select the “Turn Windows Defender Firewall On or Off”.
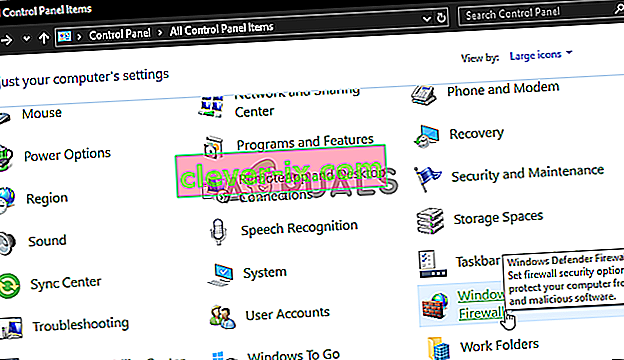
- Make sure to check the “Turn on Windows Defender Firewall” for both the available options to turn the Firewall on.
- After making this selection, save your changes and close out of the Window.
- After doing so, check to see if the issue still persists.


Method 8: Run SFC Scan
In some situations, you might’ve installed a bad driver on your computer or at some point, due to a storage failure, some system files or drivers might’ve been corrupted. Therefore, in this step, we will be running a complete system scan to identify any drivers that are missing signatures or to fix any abnormalities in the system files. For that:
- Press “Windows’ + “R’ to open the Run prompt.
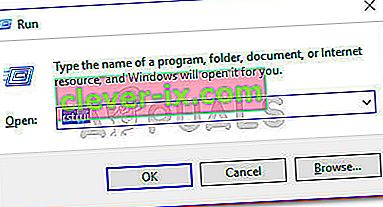
- Type in “cmd” and then press “Shift’ + “Ctrl” + “Enter” to provide admin permissions.Running the Command Prompt
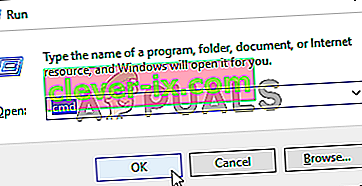
- Type in the following command inside the command prompt and press “Enter” to execute it.
sfc /scannow
- Let the computer scan for any broken or corrupted items and it should automatically replace them with working ones.
- Check to see if doing so fixes the error message.

Method 9: Disabling Data Execution Prevention
Data Execution Prevention is a program that prevents certain programs or executables from being able to run on your computer because it suspects that they might be viruses. Due to this prevention, sometimes, as a false alarm, legit applications might also face issues while trying to run on your computer. Therefore, in this step, we will be disabling this setting from the system configuration panel. For that:
- Press ‘Windows’ + “R’ to open the Run prompt.
- Type in “Control Panel” and press “Enter” to launch the classical control panel interface.

- Inside the Control Panel, click on the “View By:” icon and then select the “Large Icons” option.
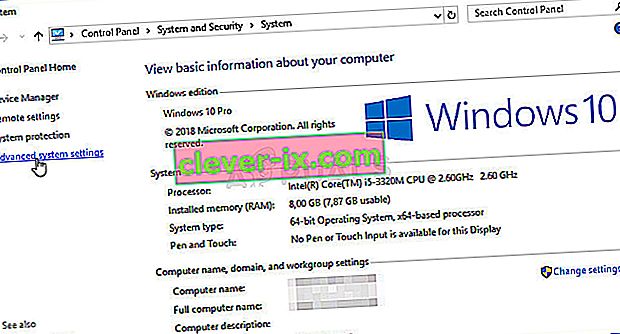
- After selecting Large Icons, select the “System” option.
- Click on the “Advanced System Settings” option on the left side of the screen.
- In the advanced System Settings, click on the “Advanced” tab from the top.
- In the advanced tab, click on the “Settings” option under the “Performance” heading.
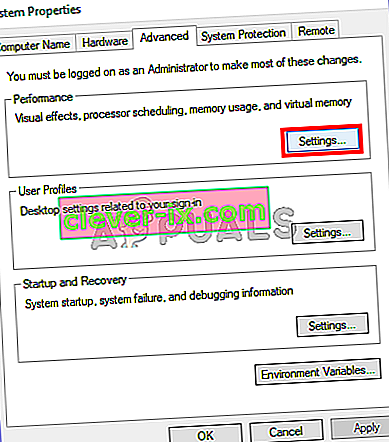
- On the next window that opens up, click on the “Data Execution Prevention” tab, and then select the “Turnon DEP for all programs except thoseI Select” option.
- After that, click on the “Add” option and point to the executable of the application that you are facing issues with.
- This way, that application will no longer come under the jurisdiction of the DEP program.
- Check to see if doing so has fixed the issue.


If the above process is unable to fix the issue, it might be because the executable isn’t the only one being affected by the DEP program. Sometimes the DEP might actually be preventing a herd of executables from being run on the computer and to counter this we will be disabling DEP completely.
Disabling DEP completely cannot be done through any Windows setting and it needs to be done manually through the command prompt. Remember to take this step as a last resort because this can in some cases makes your computer more vulnerable to viruses and malware attacks. In order to disable DEP through the command prompt:
- Press “Windows” + “R’ to open the Run prompt.
- Inside the Run prompt, type in “cmd” and then press “Shift” + “Ctrl” + “Enter” to launch in admin mode.
- Inside the command prompt, type in the following command and press “Enter” to execute it on your computer.
bcdedit.exe /set {current} nx AlwaysOff - Once the command has been executed, run the application that you want to and check to see if the error message still persists.
Method 10: Disable Firewall and Windows Defender
In some situations, the executable that you want to run on the computer might actually be blocked by the Firewall and it would not be able to make contact with its servers this way. Therefore, we will have to allow the executable in our Firewall for both public and private networks which should get it working if the Firewall is preventing it.
In addition to that, sometimes the Windows Defender might prevent the application from running on your computer because its local files might be suspicious and not properly signed. This can be due to a false alarm as well so we will be disabling the Windows Defender for the application as well by adding an exclusion. In order to do that:
- Press “Windows” + “R” to launch the Run prompt.
- Type in “ControlPanel” and press “Enter” to launch the classical control panel interface.
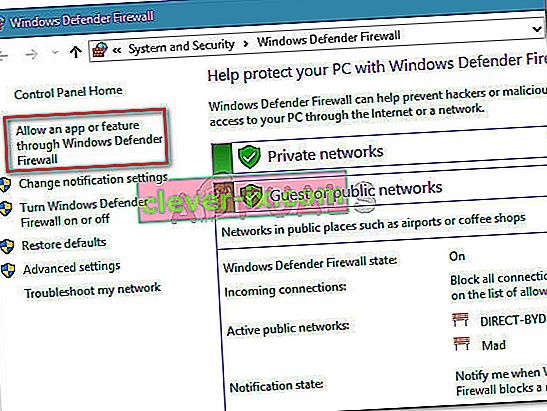
- Click on the “View by:” button, select “Large Icons” and then click on the Windows Defender Firewall option.
- Select the “Allow an app orfeature through the Firewall” button on the left pane and then click on the “Change Settings” button and accept the prompt.
- From here, make sure that you check both the “Public” and the “Private” options for the application and its entries.
- Save your changes and exit out of the window.
- After that, press “Windows” + “I” to launch the settings and click on the “Updateand Security” option.

- From the left pane, click on the “Windows Security” button and then click on the “Virus and Threat Protection” button.
- Select the “Manage Settings” button under the Virus and Threat Protection Settings heading.
- Scroll down and click on the “Add or Remove Exclusions” button in the next window.
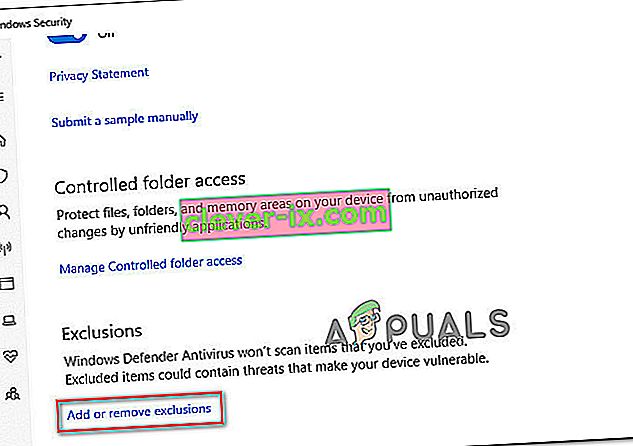
- Click on the “Add an Exclusion” option and select “Folder’ from the File type.
- Make sure to specify the application’s folder with which the issue is occurring and exit out of this window after saving your changes
- Check and see if doing so has fixed the error message.


Method 11: Reinstall Firefox
If you are getting this error while trying to launch Firefox, it might be occurring because the applications haven’t been installed properly on your computer. Therefore, in this step, we will be launching the app management window and uninstalling Firefox after which we will reinstall it completely by downloading it from the Firefox website. For that:
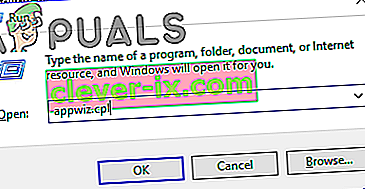
- Press “Windows” + “R” to open the Run prompt.
- Type in “appwiz.cpl” and press “Enter” to open the app management window.
- In the app management window, scroll down and right-click on the “Firefox” application.
- Select “Uninstall” from the list and then follow the on-screen instructions to remove the software from your computer.
- Repeat this step for all instances and bundled applications of the software installed on your computer.
- Make sure to disable any third-party antiviruses at this point to make sure that the software is installed smoothly.
- Head on over to the Mozilla website and click on the download button.

- Click on the downloaded executable and install it on your computer following the on-screen instructions.
- Check to see if doing so has fixed the error message on your computer.


Method 12: Scanning for Malware
It is possible in some cases that the computer has acquired malware that is preventing the user from being able to run all the system functions on their computer. Therefore, in this step, we will be using the default Windows Defender to scan our computer thoroughly for any viruses or malware that might’ve found its way on our computer. For that:
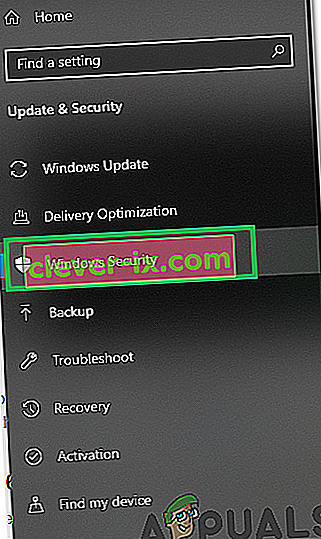
- Press the “Windows” + “I” keys simultaneously on your PC to open the Settings tab.
- Navigate to the Update& Security option and then click on the “Windows Security” button on the left tab.
- After that, click on the “Open Windows Security” and select the “Virus and Threat Protection” option.
- After that, click on the “Scan Options” button below the “Quick Scan” window.
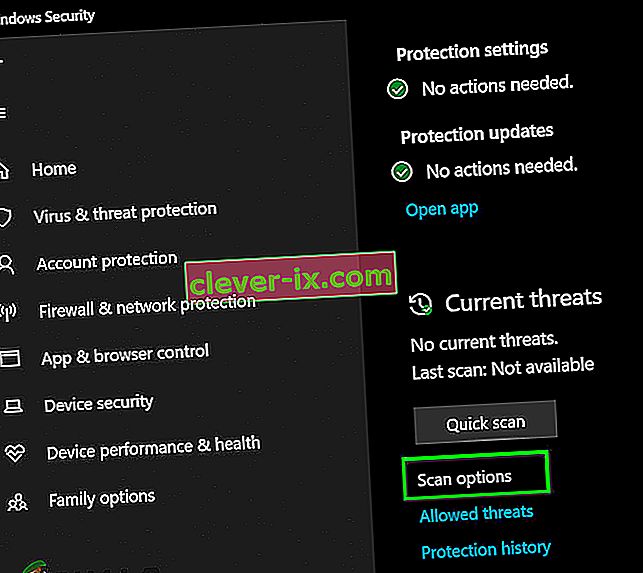
- Click on the “Full Scan” option and then hit the button of “Scan Now”.
- Wait for a few seconds while this process gets completed and then finally check if the error gets resolved now.


Microsoft Security Scanner is an additional tool that you can use to test the system for any further viruses and malware because sometimes the default tool isn’t able to perform the scan properly. Therefore, in this step, if the issue still hasn’t been resolved, we will be using the Microsoft Security Scanner to further make sure for any issues.
- Launch your browser and download the Microsoft Security Scanner from here.
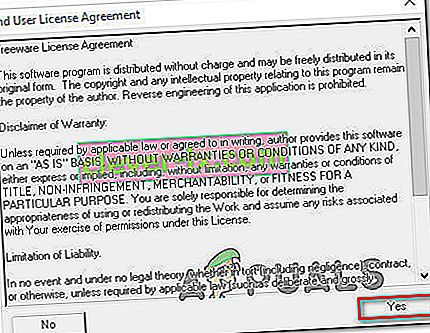
- After downloading the executable, run it on your computer and let it install.
- Accept the License Agreement terms and click on “Next”.
- Select “Full Scan” and click on “Next”.
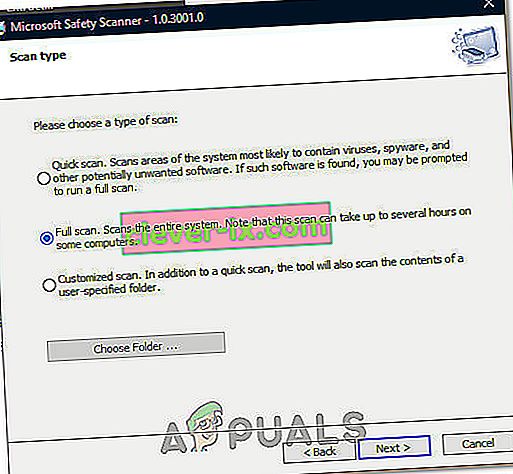
- After you opt for a full scan, the software will start scanning your entire computer to look for any malware or viruses that might’ve disguised themselves as normal executables or applications.
- After this scan has been finished, check to see if the error message still persists.


Method 13: Install Missing Drivers
It is possible in some situations that your device is missing certain drivers due to which this particular issue is being triggered on your computer. Therefore, we will be checking for any missing drivers and then we will check to see if the error is fixed. In order to do this, follow the guide below.
- Download Driver Easy on your computer.

- Run the downloaded executable and install the software on your computer.
- Run the check and see if there are any missing drivers on your computer.
- Install these missing drivers and then install them either manually or automatically using the Software.
- After installing all the missing drivers, check to see if the issue still persists.

Method 14: Reconfigure Registry
It is possible that in some cases, you haven’t properly configured all the registry settings or that you unknowingly configured something incorrectly. Therefore, in this step, we will be reconfiguring our Registry to fix a certain key that sometimes, if misconfigured, causes this particular error on Windows. In order to do this, follow the guide below.
- Press “Windows” + “R” to open the Run prompt.
- Type in “regedit” and press “enter” to launch the registry editor.
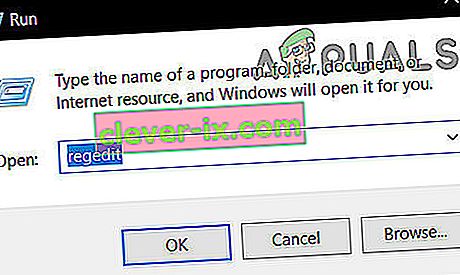
- Inside the registry editor, navigate to the following location.
HKLM\SOFTWARE\Microsoft\Windows NT\CurrentVersion\Windows\AppInit_Dlls
- Double click on the “LoadAppInit_DLLs” entry on the right side of the screen.

- Change the value of this registry from “1” to “0”.
- Save your changes and exit the registry editor.
- Check to see if doing so has fixed the error.


Method 15: Update Disk Drivers
In some cases, the Disk Drivers that are being used to control your Storage and other Disks installed on the computer might have been outdated due to which the error is being triggered. Therefore, in this step, we will first be opening the Device Management Window and from there, we will be updating these drivers. In order to do so, follow the steps mentioned below.
- Press “Windows’ + “R” to open the Run prompt.
- Type in “Devmgmt.msc” and press “Enter” to launch the device management window.

- In the Device Manager, double click on the “DiskDrives” option to expand it.
- Right-click on the storage device listed and select the “Update Driver” option.
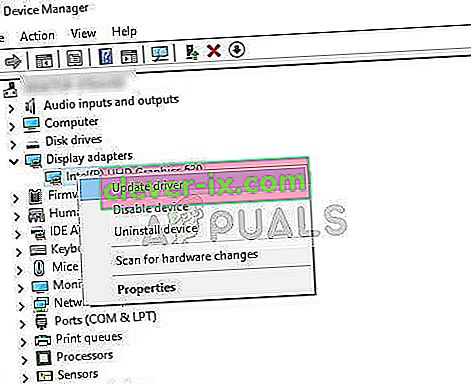
- Select the “Search Automatically for Drivers” option and let the setup search.
- If there are any drivers available, Windows will automatically check for them and install them on your computer.
- Check to see if doing so has fixed the issue.


Method 16: Disabling Automatic Updates and Uninstalling Updates
It is possible in some cases, that this error is stemming from a faulty update install. Microsoft is notorious for pushing out updates that aren’t properly customized to work for all hardware combinations and often go on to break things instead of making them better. Therefore we will make sure that the recent update isn’t installed on our computer.
In order to do this, we will have to first disable automatic updates on our computer and then we will be uninstalling the recently installed updates. Make sure to back up any important data that you don’t want to lose just in case this goes bad.
- Press “Windows” + “R’ to open the Run prompt.
- Type in “service.msc” and press “Enter”.
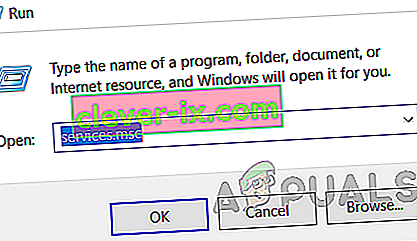
- Scroll through the list and double click on the “Windows Update” service.
- Click on the “Stop” button and then click on the “Startup Type” dropdown.
- Select “Disabled” from the list and select the “Apply” button from the window.
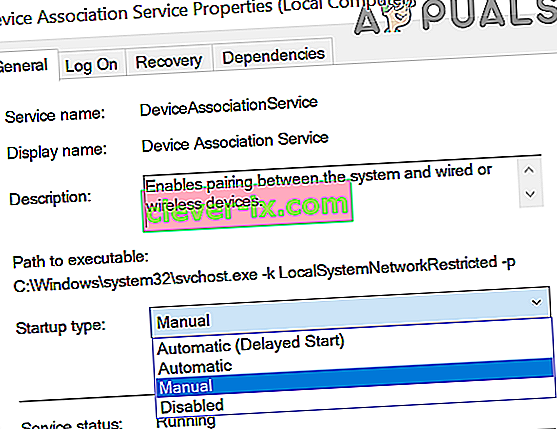
- Click on “OK” to close out of this window.
- Check to see if doing so has stopped your computer from updating.


After stopping the computer from updating, we will now be uninstalling the recent updates that have been installed on your computer. For that:
- Press “Windows” + “I” buttons to open the settings.
- In settings, click on the “Update and Security” option and then select the “Windows Update” button from the left pane.

- In the Windows Update, click on the “View Update History” option.
- In the Update History, click on the “Uninstall Updates” option and it should take you to the uninstallation screen where all the recently installed updates will be listed.
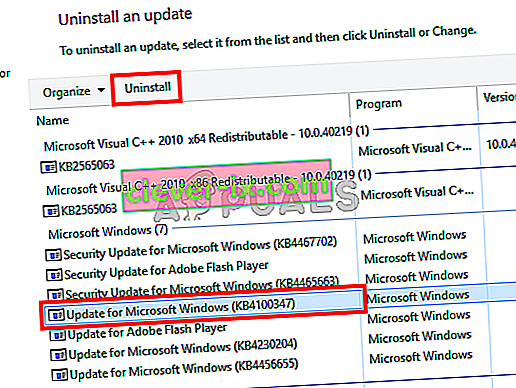
- From the list, right-click on the update that was installed recently and caused this error on your computer.
- Right-click on this update and select the “Uninstall” button to remove it completely from the computer.
- Follow through with the on-screen instructions.
- Check to see if uninstalling has fixed this issue.


Additional Fixes:
- In addition to some of the recommendations given above, you should try to check if there are any bad memory modules (RAM) installed on your computer which can be a cause of this.
- Se också till att kontrollera om du inte har överklockat RAM-minnet till en nivå som överstiger den rekommenderade gränsen. Om du har gjort det, försök att återställa det till fabriksinställningarna och kontrollera om det löser problemet.


